 Rosa Martinez

I love having a dependable icing recipe that makes sugar cookies look polished without turning the whole decorating process into a project. This sugar cookie icing that hardens is one of those back-pocket basics I come back to again and again because it spreads easily, dries with a smooth finish, and still tastes sweet and simple.


Whenever I want decorated cookies for birthdays, holidays, bake sales, or just a fun afternoon in the kitchen, this is the icing I make. It gives cookies that pretty finished look without needing complicated piping skills, and once it sets, I can stack or package the cookies much more easily.
Why You’ll Love This Sugar Cookie Icing That Hardens
I love this icing because it gives me that classic bakery-style finish while staying incredibly approachable. It comes together with pantry staples, and I can tint it with food coloring for any season or celebration.
It also dries firm enough for stacking, gifting, and storing, which makes it perfect when I want my cookies to hold up beautifully after decorating. The texture lands right in that sweet spot: fluid enough to spread, but sturdy enough to set nicely.
What Kind of Sugar Cookies Should I Use?
The best base for this icing is a sugar cookie that bakes up flat with a smooth top. I like using cut-out sugar cookies that hold their shape well because the icing sits neatly on top and shows off every color and sprinkle.
Soft sugar cookies work too, but I try to avoid cookies with very uneven tops or too much puff because the icing will not look as smooth. Let the cookies cool completely before decorating so the icing can set properly instead of melting or sliding around.
Ingredients for the Sugar Cookie Icing That Hardens
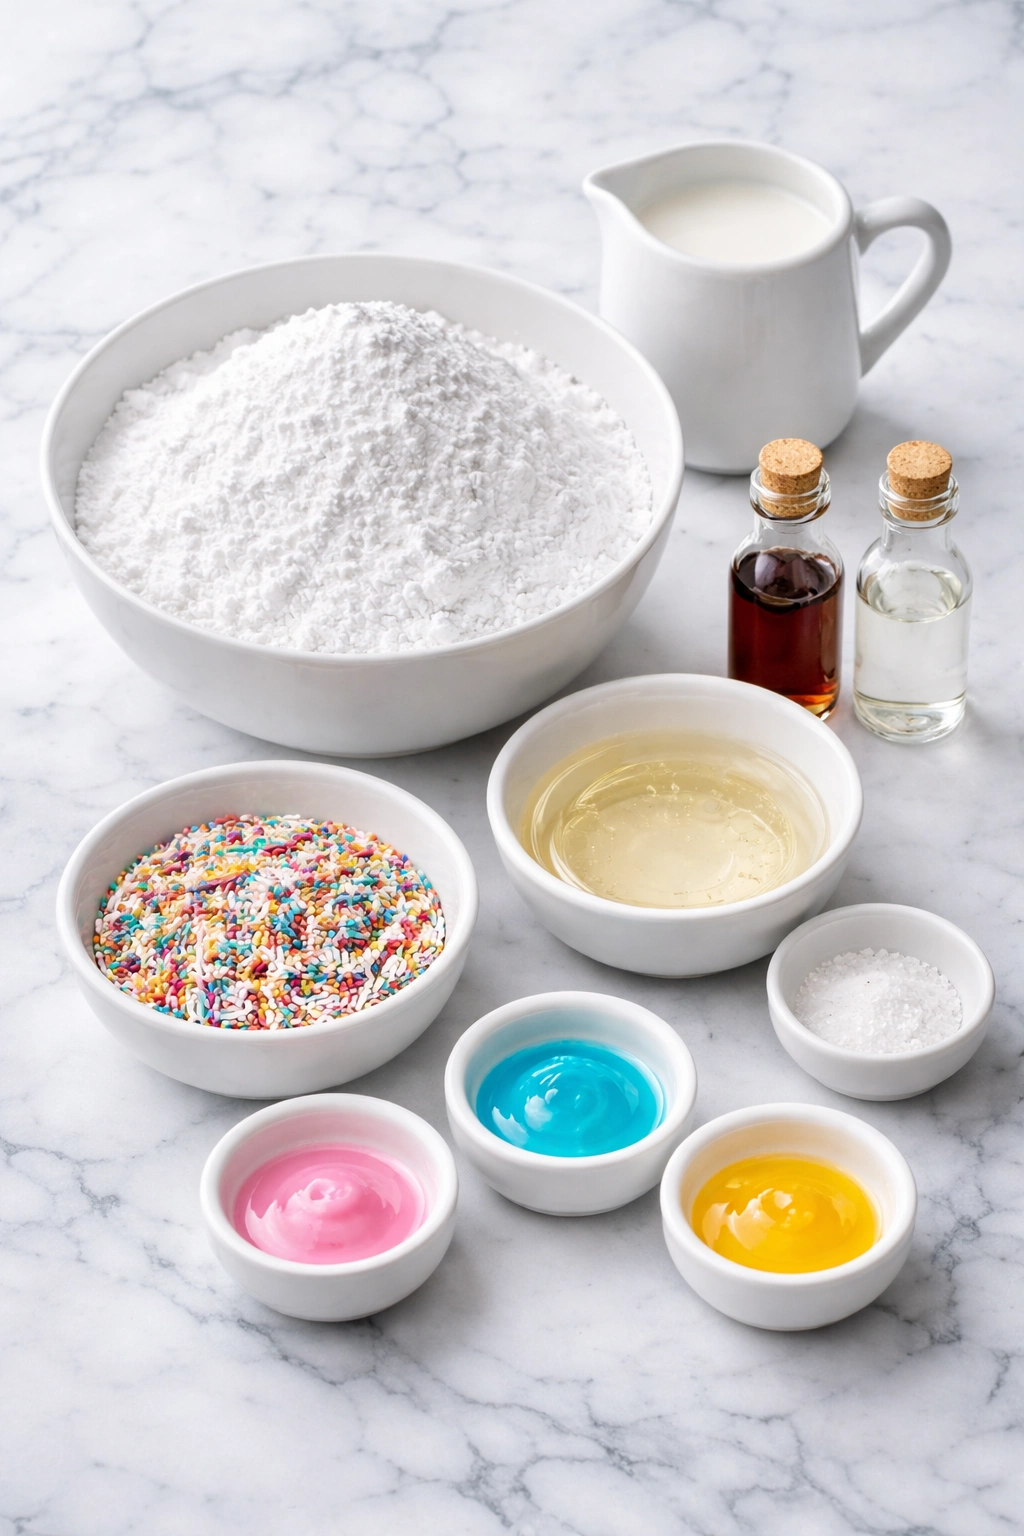
This icing uses simple ingredients, but each one matters if you want the right consistency and finish.
Powdered sugar gives the icing its sweetness and structure. It is the main ingredient that helps the icing set into a firm layer on top of the cookies.
Milk loosens the powdered sugar and creates a spreadable texture. I add it gradually so I can control whether I want the icing thinner for flooding or slightly thicker for swirling on top.
Light corn syrup helps create that smooth, glossy finish that makes decorated cookies look so pretty. It also improves the texture once the icing dries.
Vanilla extract adds familiar bakery-style flavor and takes the icing beyond just sweet. A little bit makes the whole batch taste more homemade.
Almond extract is optional, but I love using a tiny splash when I want the icing to taste more like classic celebration cookies. It gives a subtle bakery note.
Food coloring is optional too, but it is perfect when I want pastel shades, bold holiday colors, or a mix for decorated cookie trays.
Sprinkles are optional for finishing, and they need to go on before the icing sets so they stick properly.
How To Make the Sugar Cookie Icing That Hardens
This method is simple, and the biggest key is adjusting the consistency slowly until it looks just right.
Step 1: Whisk the base
Add the powdered sugar to a medium bowl, then pour in the milk, corn syrup, and vanilla extract. If you are using almond extract, add just a small amount so it does not overpower the icing.
Step 2: Mix until smooth
Whisk everything together until the icing is smooth and glossy. If it looks too thick, add a little more milk, just a tiny bit at a time. If it looks too thin, mix in a little more powdered sugar.
Step 3: Divide and color the icing
If I want multiple colors, I divide the icing into small bowls and stir in food coloring one drop at a time. This keeps the shades clean and lets me customize the cookies for any occasion.
Step 4: Decorate the cookies
Spread or spoon the icing onto completely cooled sugar cookies. I use the back of a spoon, a small offset spatula, or even a piping bag depending on the look I want.
Step 5: Add decorations before it sets
If I am using sprinkles, sanding sugar, or other toppings, I add them right away while the icing is still wet so they stick nicely.
Step 6: Let the icing harden
Leave the cookies at room temperature until the icing is fully set. Depending on how thick the icing is, this usually takes a few hours. Once dry, the cookies are much easier to stack and store.
Serving and Storing Sugar Cookie Icing That Hardens
This icing is enough for about 24 medium sugar cookies, depending on how heavily you decorate them. I love serving these cookies at parties, school events, holiday platters, and cookie swaps because they look cheerful and travel well.
Once the icing has fully hardened, store the decorated cookies in an airtight container at room temperature for up to 5 days. I like placing parchment paper between layers just to keep everything looking neat. If I am making them ahead, I always wait until the icing is fully dry before stacking or packaging.
What to Serve With Sugar Cookie Icing That Hardens
I usually pair decorated sugar cookies with a few simple favorites that make dessert trays feel complete.
Hot chocolate is a cozy option, especially during the holidays when frosted cookies feel right at home.
Coffee or lattes balance the sweetness beautifully and make these cookies perfect for afternoon treats.
Fresh fruit trays add a lighter contrast when I am serving cookies at showers, parties, or brunches.
A second cookie flavor like Peanut Butter Icing or Frosted Butter Pecan Cookies makes a dessert spread feel more fun and varied.
Frequently Asked Questions
How long does sugar cookie icing that hardens take to dry?
Drying time depends on how thickly the icing is applied, but I usually give it at least 3 to 4 hours at room temperature. For heavily frosted cookies, I often leave them overnight just to be safe before stacking them.
Can I make this icing without corn syrup?
Yes, you can leave it out, but I find the icing looks less glossy and may not set with quite the same smooth finish. It will still work, though the texture can be a little less polished.
Why is my icing too runny?
This usually happens when too much liquid is added too quickly. I fix it by whisking in a little more powdered sugar until the icing thickens to a spreadable consistency.
Can I use this icing on other cookies?
Absolutely. I have used it on cut-out cookies, soft vanilla cookies, and even drizzled it over bars. It also pairs nicely with dessert ideas like Pumpkin Bars with Cream Cheese Frosting when I want a full holiday sweets table.
How do I store leftover icing?
I keep leftover icing in an airtight container for up to 2 days. Before using it again, I stir it well and adjust with a tiny splash of milk or a spoonful of powdered sugar if needed. When I am planning a full cookie day, I like pairing these with make-ahead treats such as Chocolate Chip Snowball Cookies or Funfetti Whoopie Pie.
Save This Pin For Later
📌 Save this sugar cookie icing that hardens to your Pinterest dessert board so you can come back to it any time.
And let me know in the comments how yours turned out. Did you keep it classic with vanilla, tint it in pastel colors, or cover the tops with sprinkles? I love seeing how a simple icing recipe can turn into something totally personal.
For even more daily recipe inspiration, visit Life With Rosa.
Conclusion
This sugar cookie icing that hardens is one of the easiest ways I know to make homemade cookies look extra special without making the process complicated. It is glossy, sweet, simple to mix, and sturdy enough for stacking once it dries.
I keep coming back to it because it works for birthdays, holidays, classroom treats, and everyday baking projects when I want something cheerful and dependable. Once you try it, you will have a go-to icing that makes decorating feel easy and fun.
Print Sugar Cookie Icing That Hardens
- Total Time: 10 minutes
- Yield: 24 iced cookies
- Diet: Vegetarian
Description
This sugar cookie icing that hardens is my go-to easy recipe when I want cookies that look pretty, set beautifully, and stay simple to make. It is perfect for holiday baking, quick dessert decorating, party treats, and fun food ideas when you need an easy recipe that works for sugar cookies, cookie trays, and sweet snack tables.
Ingredients
4 cups powdered sugar
5 tablespoons milk
2 tablespoons light corn syrup
1 teaspoon vanilla extract
1/4 teaspoon almond extract
food coloring as needed
sprinkles as needed
Instructions
1. Add the powdered sugar to a medium mixing bowl.
2. Pour in the milk, light corn syrup, vanilla extract, and almond extract.
3. Whisk until the icing is smooth and glossy with no lumps remaining.
4. Add a little more milk if the icing feels too thick, or a little more powdered sugar if it feels too thin.
5. Divide the icing into small bowls if using multiple colors.
6. Stir in food coloring a drop at a time until the desired shades are reached.
7. Spread or spoon the icing onto completely cooled sugar cookies.
8. Add sprinkles right away while the icing is still wet.
9. Let the cookies sit at room temperature until the icing hardens completely before stacking or storing.
Notes
Do not add too much milk at once, because thin icing can be harder to control and may not set with the smooth finish you want.
- Prep Time: 10 minutes
- Cook Time: 0 minutes
- Category: Dessert
- Method: No-cook
- Cuisine: American
Nutrition
- Serving Size: 1 cookie
- Calories: 92
- Sugar: 19g
- Sodium: 8mg
- Fat: 0g
- Saturated Fat: 0g
- Unsaturated Fat: 0g
- Trans Fat: 0g
- Carbohydrates: 24g
- Fiber: 0g
- Protein: 0g
- Cholesterol: 0mg
Keywords: sugar cookie icing that hardens, easy cookie icing, icing for sugar cookies, glossy cookie icing, quick dessert, easy recipe, dessert ideas, holiday baking, cookie decorating, food ideas